Sunday, November 15, 2026

Ahmarra Journal, Part 2

 Phobus Anchorite battle requires you kill his minion outright. Either kill minion first turn, or kill minion twice. Phobus cannot be killed in same turn that his minion started the combat (so killing both at same time will not work). If Phobus is killed when his minion started the turn alive, Phobus will full heal. If you're having a hard time soloing this, work to kill the minion twice at least. If you die and come back after permanently defeating minion, Phobus will start alone and it becomes a normal battle. Note that Phobus still has his other cheat attacks still, so he does a lot of damage.

Soulik En Shellion Terra occasionally steals your blades and heals every third or fourth turn for 4kish health. Her minion will cast shadow sentinel as a cheat at end of turn one (avoid that by killing him first turn). She does not remove feints, you can stack her up.

Rara Avis. I don't know completely when it does it's full heal cheat... I think it's when you hit with less than four buffs up. OK. Let's get into this one. If you put an attack aura down, the boss cheat converts it to a 1% attack aura. Same with any blades and traps. They convert to 1% non-stacking buffs. He removes protections and does it again, so indemnify/aegis do not help. He has good resist too, so you're going to need to hit a lot. Empower tcs help here. One positive cheat, if he full heals, he gives you a special attack that stays on him. The trick then is to hit him normally 2 or 3 times to get the cheat hits, then hit him with only the cheat hits until you're ready to do your animus hit. I DON'T KNOW IF HE IS VULNERABLE TO NORMAL HITS AFTER BEING HIT WITH THE CHEAT HIT. To be safe, I hit thrice with the cheat hits without using gambit, then I quad buffed, then I finished with the animus hit.

Saturday, November 14, 2026

Ahmarra Journal

In the interest of keeping a record of all the puzzles and cheats of Ahmarra so that I don't have to dig through the notes of others that may or may not be compromised or only half information, I'll keep a rough journal here.

So far, here are the important keys to puzzle solving.

First whale bird hits hard and twice every turn. Don't waste time and build to make your first hit as big as possible.

Dagon Gnorr: has 200 resist. Either try to heal through it (tough to solo), put up 4 or 5 spears with biggest damage hit you have (also tough to solo), or spam feint. If you have a will-cast hex pet, all the better. If you have nightbringer, you can nightbringer a feint to double feint on next turn. Make sure the feints can stack. For the feint strat, in a team up, you can do the Balaur strat and just do mixed feints every turn.

Path room requires cantrip reveal invisible.

Slider puzzles can generally be done by lining up edges.

The two orbs door puzzle relies on what the squid guys asked of the tritons: learning in exhange for adoration.

I got past the two squid brothers by spamming scarecrow (yes my fire was using death pins).

Preceptor of suffering punishes you for using blades, auras, and hots. Don't know about defensive auras, but I avoided them. Stick to attacks, including wand shots to build pips, and empower tc.

The two fog paths are really hard (the second is easier than the first). First path remember left/left/right/forward/forward/right, and then I can't remember. The second one you go straight/right/right/left/ then I can't remember... BUT, a trick to help you! Step small stop, slowly look around because sometimes the unlit torches will break through in the fog along the peripheral of your vision. If the calescent tracker suddenly goes cold, stop immediately and start turning to find the right path. The end parts of the fog mazes are easier than the beginning.

Oh! Forgot about the first fog maze's final puzzle. The reveal invisibile cantrip helps here too. Have a pad of paper to help before using.

Sunday, May 3, 2026

The Advantage of Being a Longtime Active Player

       With the return of the Portal of Peril, there's one particular item that is super useful and makes these gauntlet runs so much faster: Dworgyn's Havoc Hood. For newer players not in the know, Dworgyn's hat is a piece of gear attainable from opening Professor's Hoard packs. It scales to the level of the opener up to level 150, so you'll want to at least be level 20 (the level 10 version only offers the Feint item card); and the reason it is so desired is that, besides the above version, it offers a Mass-Feint item card. This card puts a 75% version of Feint on all enemies, and one on the caster. The Mass-Feint stacks with all other non-gear versions of Feint, making a number of enemy bosses susceptible to first turn kills, including Lucia in this month's Portal of Peril gauntlet.

       Now any reader who has followed me may know that I never advocate spending money on pack gear as I eschew pay-to-win strategies. The caveat here is that Professor's Hoard packs are free rewards for completing the Spiral Scene and Spiral Showcase monthly events. If you're playing most events weekly on all your wizards, you're getting 12 free packs a month (6 for the Scene and 6 for the Showcase). 12 packs a month, and the law of averages is you're gonna get at least one Dworgyn's Havoc Hood soon enough. In my case, since I'm regularly doing events, I have a level 150 version on every one of my wizards. They are always in my backpacks, ready to swap when there's a need for one, even on my storm.


Sunday, August 11, 2024

Old blog, older blogger

 Still around and still playing! I had a couple posts that I wanted to make in-depth, but got sidetracked, and I hope to still visit with them (namely Castle Magic).

Monday, September 13, 2021

Fishing Tournament Results, pending

 The tournament has ended, and the results are currently being tabulated. I will update this if I get something good. However, I discovered I did NOT catch all the fish that I could. Wiz staff held a special event and hosted a party house with special fishing and prizes on Friday. Of the fish that could be caught in the house, there was a Black Catfish, a seasonal fish only available around Halloween. Since I didn't know about this special event, I didn't get a chance at this fish. If someone caught that fish and all the rest of the available fish, that automatically drops me out of the running.

I'll be watching my email for any message, though I'm now a little pessimistic.


ADDENDUM: I can't believe I (we) won! Congratulations to the other two wizards to win in our category of widest variety of fish caught - Cameron Sandblade and Michael! I'm guessing that they didn't know about the special party house event either...


Here are the complete list of winners:

The most Epic fish: Alex MoonThief with 590 caught

The most Rare fish: Jack FireTail with 709 caught

The widest variety of fish (tie):

  • John Cloud (my Necromancer)
  • Michael
  • Cameron SandBlade with 198 types caught


The most Dekoi type fish: Patrick with 252 caught

The smallest Jellyfish type fish: Elizabeth RosePetal at 22.756 inches

The smallest Eel type fish: Brian WaterSpear at 11.553 inches

The largest Codfather: Saffron SpellThief at 37.340 inches

The largest Todd Pole: Ryan LifeBloom at 42.397 inches

10 Honorable Anglers

  • Gavin EarthMender
  • Jason ShadowMancer
  • Kane LionHeart
  • Mackenzie GriffinWeaver
  • Madeline DreamThief
  • Mary SeaBreeze
  • Michelle
  • Monica ShadowThorn
  • Trevor GoldBane
  • Wolf ShadowFlame

Conclusion

So, having gone through the tournament and fishing all over again for these guys, what was the hardest fish to catch? For those familiar with the concept of RNG, the chances for an epic fish to spawn are all probably similar, which means if you're having bad luck spawning a particular fish, it's just that, bad luck. I think on average, it took about... 13 Summon Fish refreshes to get an epic fish to spawn. Sometimes, I wouldn't even need to resummon, and sometimes... such as the case of the Silver Streak, I would need to cast Summon Fish around 70 times before he spawned. Silver Streak was the fish that almost broke me. I also had a hard time catching the Ecto Slime Skate and Goldfin-ger, and that's to be expected. Both of those fish have other fish of the same school and level spawning around them, which forces you to observe their behavior to distinguish the rare from the rest. Boss Hog took a long time for me to finally summon as well, and I had a pretty hard time with a lot of the Dragonspyre fish, because of the large area to search and the difficult terrain to cover. It was a challenge, and it was fun. I want to do it all over again, but I do want to give others a chance to win too. Maybe I'll go for a different challenge, like one of the largest or smallest fish next time.

Good luck and good fishing, wizards!

Sunday, September 12, 2021

Wizard 2021 Fishing Tournament

 There are 3 winner spots, one for each of the following categories

  • Most Epic fish caught
  • Most Rare fish caught
  • Widest Variety caught

I went for the widest variety, and at 12:10 CST, on the 12th, I caught Ecto Slime Skate to (what I think) completes all the non-seasonal fish in the game. I had already caught all the Stubby Sharks, the Fall Foliage Fish, and the Gobbler Fish. I COULD BE WRONG. I may have forgotten a fish that can be caught from player's castles, but I THINK I got them all.

Some Observations.

  1. When you use the Fishing Benefit Elixir from your gift box, it doesn't automatically start. It instead goes into your backpack. I wrote a support ticket for it, and had to write back to tell them I done goofed.
  2. The Fishing Benefit Elixir gives you a free hour of zero energy fishing. I can totally see the joy of fishing during the zero energy fishing times for members. With only one hour, I was able to collect four hard-to-get epic rares.
  3. You need to know when it's smart to stay and refresh the fish, and when it's better to move to the next fish on your list. Energy isn't unlimited unless you got the crowns to spend through. Make a plan to visit all your rare and epic fish spots in a circuit. That keeps you from spending energy on the Summon Fish spell, the most energy cost on your fishing tour. 
  4. DON'T FORGET THAT CERTAIN FISH ARE SENTINELS. I'm looking at you, Devil Ray. I'm embarrassed at how much energy I burned before realizing my mistake there. The one time Banish Sentinel is NOT your friend.
  5. If you craft snacks, this event has synergy.
  6. Aero Village. Those who know, know.
  7. If you have Private Fishing Retreat, it's never been easier to make new friends! Thank you, Rowan Starsong!

A lovely fish caught in a lonely place.

Can you guess what I'm about to fish?


Monday, August 16, 2021

Castle Magic Experiments

 I've already used some Castle Magic in my houses, but I'm embarking on a more intensive project for my Pyromancer that will involve moving parts. So I decided I would describe some of my findings here. Parts of this will be written as if you don't know anything about Castle Magic. Forgive me if it reads like I'm dumbing things down.

The last time I used it, I had some uneven results. I got things to work eventually, but I didn't understand why the counters weren't working like they should. I will still need to investigate the use of Counters and Computers.

My house will be a sort of Twilight Zone affair with clocks moving about all over the place and doing freaky things. I plan on having them spin, grow and shrink, rise and fall, move about, and fade in and out.

If this is your first time figuring out what to do with Castle Magic, you purchase the items from Babbage Basset in Regent's Square of Marleybone (near the museum). In one section of his "shop", you buy the items that you place in your house. These are house decorations and count toward your house item limit. In another section of his shop, you buy what are essentially treasure cards that are the "spells" that you insert into your Castle Magic items to make them work. These count toward your treasure card limit. The average cost of the items is about 2000 gold, and the average cost of the spells is 1000 gold.

Spinning Clock Tower

I started with the easiest thing - making a clock tower spin. When you want something to occur only once, you can use certain kinds of trigger items, like pressure plates or switches, or items that detect players getting close. I tend to use a Magic Start Detector that triggers when the player first arrives to the house. But for spinning, I want the magic to be continuous. So I use a Magic Timer.

Once you buy your items and spells from Babbage Basset, you port to your house and then open up your house inventory so you can place your Castle Magic decorations (such as the Magic Timer item). Technically, they can be anywhere around the house as long as in same house zone as the items you want to activate (outside Castle Magic affects outside zone and items only), but it's a good idea to keep your Castle Magic items near the objects you wish to affect. A quick way to figure out which items any particular Castle Magic decoration affects is to left click on the item itself and watch the yellow arrows flowing away from the decoration to those items being affected.


Here you can see a blue box and an orange ball, joined together, as well as my house inventory open, since I'm placing Castle Magic items into my house. If that menu isn't open, you won't see any of your Castle Magic decorations. You can move these Castle Magic items into other objects, but that doesn't have any affect on their behavior. People tend to move Castle Magic items into each other to make it visually apparent which items are affecting each other. You click on the Castle Magic item to show a menu where you can move the item, pick it up, but also enter that item's specific Castle Magic menu (a symbol at the top).
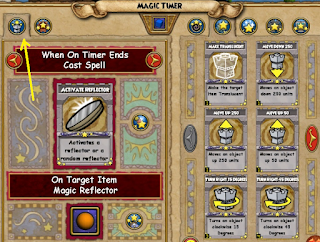

Here's the Magic Timer. I wanted continuous spin, so I used that instead of the Magic Start Detector. The first tab at top is for what spells you are using, and what items they are affecting. The Magic Timer usually goes through an intermediary Castle Magic item to start spells that affect your environment, the Magic Reflector, which can perform multiple simultaneous actions. And that's what I've done here. I cast to Activate Reflector (by putting the treasure card in that top area), and then pointed the spell to the item I wanted activated, the Magic Reflector. If you click that little circle containing stars, you can then click on the card or object you wish to affect, and that fills in the spell or item.


The second tab (if there is one) controls the behavior of the Castle Magic item, and in the case of the timer, you have the power to adjust how long before the spells are cast, whether the spells cast only once or whether they repeat, whether the timer starts on its own when the house is visited, and if you visually show the timer to visitors (including you). I keep that timer display turned off unless I want to see if it's actually working. Usually people want the timer set to one second for the On setting and zero seconds for the Off setting, because the majority of Magic Timer uses are for growing objects or making them trigger immediately upon visiting their house.


Here is the Magic Reflector's menu (the one that I linked the Magic Timer to). You'll notice at the very top, it says "When Activated Do #2 Cast Spell". This is the second spell I'm casting. You can toggle between up to eight different spells using the scroll arrows at top. There are three different turn spells for each direction, left or right: 15 degrees, 45 degrees, and 90 degrees.

Here is the part of the experimentation that might be new information to some experienced Castle Magic users. If you put only one spell in for turning an object, it will start and stop instead of turning smoothly. You may want that affect, like the way a clock's second hand moves around the face. But I wanted a smooth spin. I had to look around on the web to find videos on how others did it. I found a video that used multiples of the same spell, four Turn Right 90 Degrees spells. But how many are are required? By the math, I needed to achieve at least 135 degrees of turning between the spells I used at the settings I had (one second timer On, zero seconds Off). That means you could use two Turn Right 90 Degrees spells, or one Turn Right 90 and one Turn Right 45 Degrees spell, or three Turn Right 45 Degrees spells. 

If you want to achieve a smoothly continuous spinning object, you will need a Magic Timer set to one second On and zero seconds Off, with Repeat checked, and point it to a Magic Reflector that casts a pair of Turn Right (or Turn Left) 90 Degrees spells to affect your intended target. You can use other triggers to turn on and off your spinning object by turning on and off that Magic Timer, or you can just have the Magic Timer checked to be turned on at the start.

Automated Up and Down Magic

Most Castle Magic that uses elevator type effects utilizes a Jump trigger to raise or lower a platform. I wanted instead a Clock Tower that would smoothly float up and down continuously. This required more Castle Magic items to make work, and some adjustments to the timers to make them flow smoothly.

First, here's my setup:


I start the whole thing with a Start Magic Detector item. This will start the whole magic chain as soon as someone visits the house, which by now you can see is the Red Barn Farm. The Start Magic Detector will cast the spell Start Timer on the Magic Timer I'm pointing at with the yellow arrow. That will be my timer that controls the upward motion of the Clock Tower. I did not check the box to have the Magic Timer automatically start, not for this timer or the other one that will control the down motion.

The orange balls you see in the above picture are all Magic Reflectors that are affected by the timers and counters they are attached to. It's probably a good habit to attach them to avoid confusion of which item is affecting what; but it's important to know you can have multiple items affecting the same reflector!

Magic Timer #1 was set to repeat at two seconds On and zero seconds Off, pointing to the Magic Reflector #1. Magic Reflector #1 had the spells Move Up 250 and Add Counter. So what are the spells for the Magic Counters for? The Counters will add up to a certain point, and when they reach that point, they will shut off the magic from one timer, and start the other. Thus the Magic Counters control when to float the object up and when to float the object down. They say, "I'm full; go the other way."

The Add Counter spell from Magic Reflector #1 was pointed at Magic Counter #1. I set that counter to 5 (see below).


Also, I didn't want to display the counter's value on the screen. There are reasons to do that, like if you want to set up some sort of scavenger hunt game in your house, or if you're trying to make sure things are working, but I didn't want counter numbers showing up for visitors. With a value set to 5, it meant my timer/reflector combo would raise my Clock Tower five times before the Magic Counter would reach it's limit to cast the new spell. Magic Counter #1 has the switch to the reflector I've labeled Counter Reflector #1 once it reaches it's set value (5).

Magic Reflector #1 does the following spells: Stop Timer (pointing to Magic Timer #1, Reset Counter (pointing to Magic Counter #2), and Start Timer (pointing to Magic Timer #2). Now the new timer/reflector combo goes through its job of lowering the Clock Tower using Move Down 250 while adding counters to Magic Counter #2.

After some experimentation, I noticed a problem. My set up is good, except for the timer values set with the Move Up 250 spells. Every 100 units takes about a second to complete. If you set your timer to 2 seconds On, and use Move Up 100 or Move Down 100, you will get a second of pause after each movement. So a jerky motion instead of a smooth motion. If you set it as I did for 2 seconds On, but are using a Move Up 250 or Move Down 250, the motion will be smooth, but you are getting excess time added on to the process, and that messes up the timer on it's way down. You don't get the object arriving back to it's starting position before it starts back up the upward movement path, and probably vice versa. I changed my numbers to match each other.

My timers are set for casting spell with 1 second On, and zero seconds Off, and I use the Move Up 100 and Moved Down 100 spells. This ensures my floating object moves smoothly, and arrives to the same top and bottom points every time. If you were to use this, you can adjust the height using the Magic Counter's value... a lower number for a smaller rise. Just make sure your Magic Counter values match!

Conclusion

That's a lot of words for only two Castle Magic effects. I learned that you can make your house decorations move smoothly, but there are some number values you need to know to make that work. Spinning requires more than one rotation spell, and that value of the combined spells in degrees must be at least 135 (it can be more, and the spell still works fine). If you are moving items up or down, they move at a rate of one second for every 100 units. That probably applies to other directions, too; but I have yet to run those experiments.